Transforming Flat Surfaces into立体 Art: The Guide to Making a 3D Paper Flower and Vinyl Chalkboard Sign
In the world of DIY home decor, there is a distinct magic in taking something mundane—a simple black board—and elevating it into a statement piece. This transformation isn't just about aesthetics; it’s about adding texture, depth, and personality to a space. Whether you are looking for a heartfelt gift for a housewarming or a unique accent for your living room, learning How to Make a 3D Paper Flower and Vinyl Chalkboard Sign offers a perfect blend of technical skill and creative expression.
This project, guided by expert Alex Vanover, moves beyond basic crafting. It introduces you to precision cutting with a Cricut machine, the strategic application of permanent vinyl, and the delicate art of creating dimensional paper flowers. By the end of this process, you won’t just have a sign; you will have a finished 3D wall art piece that commands attention. Let’s dive into the materials, techniques, and considerations that make this project both accessible and rewarding.
Gathering Your Tools and Materials
Before diving into the cutting mat, it is essential to assemble your toolkit. The success of this project relies heavily on having the right equipment, particularly if you are using a digital cutter like the Cricut. While you can use scissors, a machine ensures consistent, clean cuts that are vital for the rolling technique used in the flowers.
- Cricut Machine: Essential for cutting both the cardstock for the flowers and the vinyl for the text.
- Permanent Vinyl: Unlike removable vinyl, permanent adhesive is crucial here. You want this sign to stay exactly where you place it, whether indoors or on outdoor furniture.
- Cardstock: Choose high-quality, thick cardstock for the flowers. Thinner paper may not hold its rolled shape well, while too-thick paper might be difficult to roll tightly.
- Chalkboard Painted Wood or Pre-made Sign: A smooth surface is key for vinyl adhesion.
- Transfer Tape: Necessary for moving the vinyl decal from its backing to the chalkboard without misalignment.
- Hot Glue Gun: For securing the 3D elements.
- Two Downloadable Graphics: As part of the class, you will have access to specific design files that optimize the layout for your chosen sign size.
The Precision Cut: Vinyl and Cardstock
The foundation of your 3D Paper Flower and Vinyl Chalkboard Sign lies in the cut. Using the provided graphics, you will first load your permanent vinyl onto the cutting mat. The Cricut handles the intricate lettering and any decorative borders with ease. However, the true artistry begins when you switch to cardstock for the floral elements.
When cutting the flowers, pay close attention to the layering. Most 3D flower designs require multiple layers of petals, each slightly smaller than the last. If you are new to this, start with a single-layer petal design to understand the mechanics before attempting complex, multi-tiered blooms. Ensure your blade is sharp; a dull blade can tear the cardstock, ruining the clean edges needed for a professional look.
Mastering the Roll
Once your petals are cut, the next step is bringing them to life. This is where the "3D" aspect comes into play. Using a cone tool or even a pencil, you will gently roll each petal. The goal is to create a spiral effect that mimics the natural curl of a real flower petal. Do not crush the paper; instead, apply gentle pressure to set the curve. Allow the petals to rest for a few minutes after rolling; this helps them retain their shape once glued.
Varying the tightness of your rolls adds organic variety. Some petals should be loosely curled, while others are tighter spirals. This variation prevents the arrangement from looking manufactured and gives it a lush, garden-fresh appearance.
Application Techniques: The Hinge Method
One of the most common frustrations in vinyl crafting is misalignment. A slight shift during application can ruin the entire design. To avoid this, Alex Vanover recommends using the hinge method. This technique is particularly useful for larger decals or signs where precision is paramount.
- Weed the Vinyl: Remove all excess vinyl, leaving only your desired design on the clear transfer tape.
- Create the Hinge: Peel back half of the transfer tape backing, folding it over itself so it doesn’t touch the sticky side. This creates a "hinge."
- Positioning: Align the exposed half of the vinyl with your desired starting point on the chalkboard. Press it down firmly.
- Secure and Release: Once the first half is secured, slowly peel back the remaining backing and press the second half into place. Use a scraper tool to ensure strong adhesion, working from the center outward to remove air bubbles.
This method allows you to adjust the position up to the moment of final contact, ensuring your text is perfectly centered and level. It is a small step that makes a massive difference in the final quality of your 3D Paper Flower and Vinyl Chalkboard Sign.
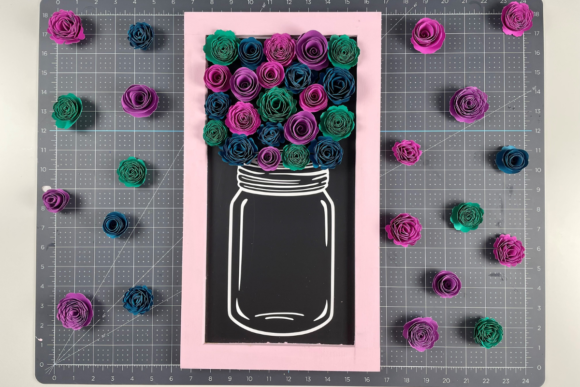
Assembling the Floral Arrangement
With the vinyl securely applied, it is time to add the dimension. Hot glue is the preferred adhesive for attaching paper flowers because it dries quickly and provides a strong bond for porous surfaces like wood or painted boards. However, caution is advised; hot glue can burn fingers and leave visible strings if not handled carefully.
Start by building your flower cluster. Apply a small dot of glue to the base of your largest petals and stack them, rotating slightly between layers to create volume. Once the individual flowers are formed, arrange them at the top of the chalkboard sign. Consider the weight distribution; placing all heavy flowers on one side might cause the sign to tilt if hung improperly. Aim for a balanced, asymmetrical look that feels natural rather than rigid.
After gluing the flowers to the sign, check for stability. Gently tug on the arrangement to ensure the glue has held. You can also add smaller filler elements, such as tiny leaves or buds, to fill gaps and enhance the fullness of the bouquet.
Why Choose This Project?
Creating a 3D Paper Flower and Vinyl Chalkboard Sign is more than just a craft activity; it is a practical solution for modern home styling needs. Here is why this project resonates with DIY enthusiasts:
Personalization and Sentiment
Store-bought decor often lacks personal touch. By designing your own message, you can tailor the sign to specific occasions—weddings, birthdays, or seasonal changes. The combination of handwritten-style vinyl fonts and hand-rolled flowers creates a sentimental value that mass-produced items cannot match.
Cost-Effectiveness
Compared to purchasing custom 3D wall art, which can cost hundreds of dollars, this project is incredibly affordable. The materials cost is minimal, especially if you already own a Cricut. Even if you do not, the versatility of the machine pays for itself through countless other projects.
Skill Development
This project serves as an excellent training ground for mastering two critical skills: vinyl application and paper engineering. These skills are transferable to other areas of crafting, from making stencils to creating detailed scrapbook layouts. Understanding how to manage adhesive and paper tension builds confidence for more complex designs.
Considerations for Longevity and Display
While the visual impact is immediate, consider the longevity of your creation. Permanent vinyl is durable, but it can fade if exposed to direct sunlight for extended periods. If you plan to hang this sign near a window, be mindful of potential fading over time. Additionally, paper flowers are susceptible to dust. Placing the sign in a low-traffic area or occasionally dusting it with a soft brush will keep it looking fresh.
Another consideration is the mounting hardware. Since the addition of flowers adds weight, ensure your hanging mechanism is robust. D-rings or heavy-duty sawtooth hangers are recommended over simple string. If the sign is large, consider using two hanging points to distribute the weight evenly.
Final Thoughts
Learning How to Make a 3D Paper Flower and Vinyl Chalkboard Sign opens up a world of creative possibilities. It bridges the gap between digital precision and tactile artistry, resulting in a product that is both technically sound and emotionally resonant. Whether you are a seasoned crafter looking to refine your vinyl skills or a beginner eager to try your first 3D project, this guide provides the roadmap to success.
The beauty of this project lies in its adaptability. Change the color palette to match your interior design scheme. Swap out the flower types for different seasons—cherry blossoms for spring, mums for autumn. With the downloadable graphics and the hinge method technique in your toolkit, you are equipped to create beautiful, lasting pieces of art that elevate any space. So, fire up your Cricut, grab your glue gun, and start turning flat surfaces into立体 masterpieces today.