Making 3D Flowers Jar Cards with Cricut
In the realm of paper crafting and digital fabrication, few projects offer as much visual impact relative to the learning curve as three-dimensional (3D) pop-up cards. Among these, the "flower jar" card stands out as a sophisticated yet accessible project that bridges the gap between simple greeting cards and complex mechanical paper engineering. Making 3D Flowers Jar Cards with Cricut is not merely about cutting shapes; it is an exercise in spatial planning, material manipulation, and precise assembly. For hobbyists, educators, and small business owners alike, mastering this technique provides a tangible skill set that enhances product offerings and personal creative workflows.
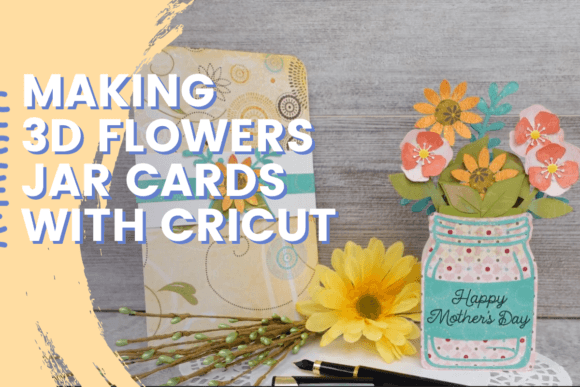
This process involves creating a layered composition where floral elements appear to bloom from within a container, utilizing depth and shadow to create realism. While the final result looks intricate, the underlying mechanics rely on standard scoring, folding, and adhesive techniques that are well within reach for anyone with basic Cricut experience. The value of this project lies in its scalability: it serves as an excellent template for understanding how flat vector designs translate into volumetric structures, a concept applicable to packaging design, event stationery, and educational materials.
Understanding the Workflow Integration
To effectively integrate Making 3D Flowers Jar Cards with Cricut into your broader creative or business workflow, it is essential to view the project through the lens of production stages: design, preparation, execution, and finishing. This structured approach ensures consistency and quality control, whether you are making a single gift for a friend or producing a batch for an online store.
The workflow begins long before the machine starts cutting. It starts with file organization and material selection. Unlike flat cards, 3D cards require specific paper weights to hold their shape without buckling. Lightweight papers may lack the structural integrity needed for the jar’s base, while overly thick cardstock can make delicate scoring difficult. Understanding these material properties is crucial for achieving professional results. In a commercial context, selecting durable, high-quality cardstock also reduces return rates and increases customer satisfaction, as the card survives handling better than flimsier alternatives.
Design and File Preparation
The first practical step in Making 3D Flowers Jar Cards with Cricut is acquiring or designing the necessary files. Most creators utilize pre-made SVG (Scalable Vector Graphics) files available from various digital marketplaces or community forums. When evaluating these assets, look for files that include distinct layers for the jar body, the lid, the stems, and individual flower components. A well-structured file will separate these elements clearly, allowing for efficient nesting during the cutting phase.
If you are customizing designs for branding purposes, such as adding a logo to the jar or altering color palettes to match seasonal trends, ensure your editing software supports layer management. This allows you to isolate specific components for recoloring without disrupting the entire layout. Additionally, consider the scale of your design. Standard 5x7 inch cards provide ample space for detailed flowers, but smaller formats like 4x6 inches require more compact arrangements. Planning your dimensions early prevents mid-project resizing errors that can throw off alignment.
Execution and Machine Setup
Once your files are prepared, the focus shifts to machine setup. Making 3D Flowers Jar Cards with Cricut requires precision, particularly when dealing with multiple colors and materials. To maintain efficiency, group cuts by color and material type. This minimizes mat changes and reduces the risk of misalignment caused by removing and reattaching the cutting mat.
Use strong grip mats for heavier cardstocks and standard grip mats for lighter papers. If you are using patterned paper, pay close attention to the grain direction if possible, though this is less critical for small decorative pieces than it is for large structural items. Before committing to expensive cardstock, always run a test cut on scrap paper to verify blade sharpness and pressure settings. A dull blade can tear delicate flower petals, ruining the aesthetic appeal of the final piece.
- Blade Maintenance: Ensure your Fine Point Blade is clean and sharp. Residue from previous projects can affect cut quality, especially on intricate floral details.
- Mat Cleanliness: Wash your mats regularly to restore tackiness. A weak mat can cause shifting during cutting, leading to misaligned layers.
- Nesting Efficiency: Arrange your design elements tightly on the canvas to minimize waste. This is particularly important when working with specialty papers that carry a higher cost per sheet.
Assembly Techniques for Depth and Realism
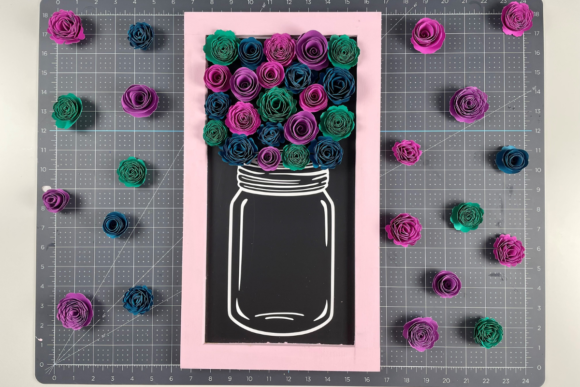
The true artistry of Making 3D Flowers Jar Cards with Cricut emerges during the assembly phase. This is where the flat cut pieces transform into a dynamic 3D object. The core mechanism relies on strategic folding and layering. The jar itself typically consists of a front panel, a back panel, and side gussets that create volume. Scoring these lines accurately is non-negotiable; uneven scores lead to crooked folds and a lopsided appearance.
For the floral elements, Cindy-Lynn’s approach emphasizes creating dimensionality. Instead of gluing flat flowers directly onto the card base, use adhesive foam dots or strips to lift certain elements. This creates shadows and highlights, mimicking the way light interacts with real objects. By varying the height of the adhesive, you can establish a foreground, midground, and background, giving the viewer’s eye a path to follow through the design.
Another key technique is manipulating the flower petals. After cutting, gently curl the edges of the petals using a ball tool or a stylus. This simple action breaks the rigid geometry of the cut, introducing organic movement. You can also layer multiple flowers of different sizes to create a fuller bouquet. Place larger blooms at the base and smaller ones toward the top to simulate natural growth patterns.
Enhancing Visual Impact
A common challenge in 3D card making is ensuring the flowers "pop" against the background. To achieve this, consider the contrast between your materials. A dark-colored jar with bright, vibrant flowers creates a striking visual contrast. Conversely, a monochromatic scheme relies entirely on texture and shadow for interest. Experimenting with metallic foils or glitter cardstock for the flowers can add a touch of luxury, elevating the perceived value of the finished product.
Additionally, think about the closure mechanism. Some designs incorporate a fold-over lid for the jar, which adds another layer of complexity but also enhances the interactive nature of the card. Ensuring that the lid fits snugly requires careful measurement and testing. A poorly fitting lid can detract from the overall polish of the project, so take the time to adjust dimensions if necessary before final assembly.
Quality Control and Long-Term Application
After completing your first Making 3D Flowers Jar Cards with Cricut project, conduct a thorough quality check. Inspect all folds for crispness, ensure adhesives have dried completely, and verify that no loose ends or glue residues are visible. These details distinguish amateur work from professional-grade output.
As you become more comfortable with this technique, you can expand its application across various domains. Educators can use these cards to teach geometry and spatial reasoning. Small business owners can offer them as premium add-ons during holidays or special events. Bloggers and content creators can document the process, providing valuable tutorials that drive engagement and establish authority in the crafting niche.
Furthermore, the skills gained from this project are transferable. The principles of layering, scoring, and structural integrity apply to other 3D paper crafts, such as boxes, standees, and invitation suites. By mastering the flower jar card, you build a foundational understanding of paper engineering that empowers you to tackle more ambitious projects with confidence.
Conclusion
Making 3D Flowers Jar Cards with Cricut is a rewarding endeavor that combines technical precision with artistic expression. It offers a clear pathway for improving your craftsmanship while delivering a visually stunning result. By approaching the project with a structured workflow—focusing on preparation, precise execution, and thoughtful assembly—you can consistently produce high-quality cards that delight recipients. Whether for personal enjoyment or professional gain, this project exemplifies how digital tools can enhance traditional crafts, creating opportunities for creativity and connection in a tangible form.