Customize Gifts Using 3D Puff Heat Transfer Vinyl
There is a distinct tactile satisfaction in touching something you made with your own hands. It’s not just about the visual appeal; it’s about the texture, the dimension, and the knowledge that no two items are exactly alike. This is where Customize Gifts Using 3D Puff Heat Transfer Vinyl comes into play. While standard heat transfer vinyl (HTV) has been a staple for crafters and small business owners for years, 3D puff HTV offers a level of depth and professionalism that elevates a simple project into a premium product. If you have ever felt stuck in a creative rut or wanted to add a unique selling point to your handmade goods, this material might be the untapped potential you’ve been looking for.
The process is surprisingly accessible, especially if you already own a cutting machine like a Cricut and a mini-press. The magic happens because the vinyl contains a foam layer that expands when heated, creating a raised, cushioned effect. This isn’t just a gimmick; it changes how people interact with your gifts. A t-shirt becomes more than fabric; it becomes an experience. However, mastering this technique requires a shift in mindset from flat design to dimensional thinking. You need to consider thickness, heat distribution, and adhesion in a whole new way.
Why Choose 3D Puff HTV Over Standard Vinyl?
When deciding between standard HTV and 3D puff, the primary differentiator is the final aesthetic. Standard vinyl lies flat against the substrate, which is great for detailed logos or intricate text. In contrast, 3D puff creates a bold, retro-inspired look that stands out both visually and physically. This makes it particularly effective for short words, initials, or simple graphic elements that benefit from emphasis. Because the material expands, designs must be mirrored before cutting, and spacing between letters often needs adjustment to prevent them from merging during the heating process.
For entrepreneurs and hobbyists alike, the versatility of this medium cannot be overstated. It allows you to create products that feel custom-made without the high cost of embroidery. Embroidery is durable but can be stiff and expensive, especially for complex designs. 3D puff HTV offers a softer hand-feel and a wider range of color options at a fraction of the price. This accessibility opens up new revenue streams for those selling on platforms like Etsy or at local farmers' markets. It transforms ordinary items into statement pieces that customers are eager to share on social media, providing organic marketing for your brand.
Real-World Applications: Beyond the T-Shirt
While apparel is the most common application, limiting 3D puff HTV to t-shirts ignores its true potential. Let’s look at how different users can leverage this material in various settings.
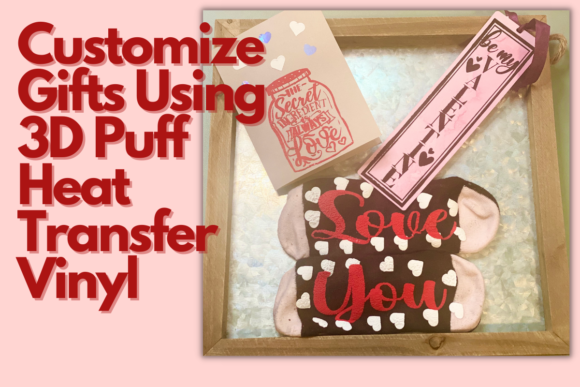
- Educators and Teachers: Imagine creating personalized bookmarks for students at the end of the school year. A bookmark with a student’s name in puffy vinyl adds a sense of importance and permanence to their reading materials. It’s a low-cost, high-impact gift that encourages literacy and personal connection.
- Parents and Families: Personalized socks are a fantastic idea for holidays or birthdays. Using grippy soles on the bottom, you can create custom slippers or house shoes for family members. The durability of the vinyl ensures that names and designs withstand multiple washes, making these gifts practical as well as sentimental.
- Small Business Owners: For those running boutique shops, branded merchandise is crucial. Instead of plain tote bags or water bottles, adding a 3D puff logo gives your brand a professional, established look. It signals quality and attention to detail, which can justify higher price points for your products.
- Craft Enthusiasts: Even if you aren’t selling anything, the joy of creation is reward enough. Try applying 3D puff vinyl to greeting cards. The textured surface catches the light differently and invites touch, making the card itself a keepsake rather than disposable paper.
These scenarios highlight why understanding the "where" and "why" of 3D puff is essential. It’s not just about sticking vinyl to fabric; it’s about solving specific gifting problems with creative solutions. Whether you are preparing for Christmas, back-to-school season, or wedding favors, this material provides a versatile toolkit for personalization.
Practical Considerations Before You Start
Success with 3D puff HTV hinges on preparation and precision. Unlike standard vinyl, there is little room for error once the heat is applied. Here are critical factors to keep in mind:
- Mirror Your Design: Always mirror your image before cutting. Since the vinyl is applied face-down, mirroring ensures the final result reads correctly.
- Adjust Pressure and Time: Heat presses require specific settings for puff vinyl. Too much pressure can flatten the foam, while too little may result in poor adhesion. Experiment with scrap pieces to find the sweet spot for your specific machine.
- Consider Substrate Compatibility: Not all fabrics react well to the high heat required for puffing. Cotton and polyester blends generally work best. Delicate fabrics like silk or thin synthetics may melt or distort under the necessary temperatures.
- Plan for Expansion: Remember that the vinyl will expand by approximately 20-30%. Design your graphics with this expansion in mind. Thin lines may disappear, and closely spaced letters may merge into an unrecognizable blob.
Additionally, investing in quality tools pays off. A reliable mini-press or heat press with even heat distribution is non-negotiable. Cheap irons often have hot spots that can burn the vinyl or leave areas unmelted, leading to peeling and frustration. Similarly, using a sharp blade and proper weeding tools ensures clean edges, which are vital for the crisp look that 3D puff is known for.
Learning Resources and Next Steps
If you are ready to dive in, structured learning can save you time and material. Classes led by experienced creators, such as Tara from Sweet Country Glam, offer invaluable insights. These sessions often provide downloadable resources, including graphics and fonts specifically designed for 3D puff applications. Having pre-made templates allows you to focus on the technique rather than struggling with design software.
In upcoming sessions, you might explore projects like personalizing cards, crafting unique bookmarks, or designing pairs of grippy socks. Each project builds on the last, gradually increasing in complexity and confidence. By the end of such a course, you won’t just know how to cut vinyl; you’ll understand how to think dimensionally. You’ll see opportunities for customization everywhere—from office supplies to home decor.
Ultimately, Customize Gifts Using 3D Puff Heat Transfer Vinyl is about more than just crafting; it’s about connecting with others through tangible, thoughtful gestures. In a digital world, holding a physical object with your name or a loved one’s name raised in vibrant color creates a memorable impression. It’s a skill set that blends creativity with commerce, offering endless possibilities for expression. So, turn on your Cricut, grab your mini-press, and get ready to be inspired. The potential is there, waiting for you to bring it to life.