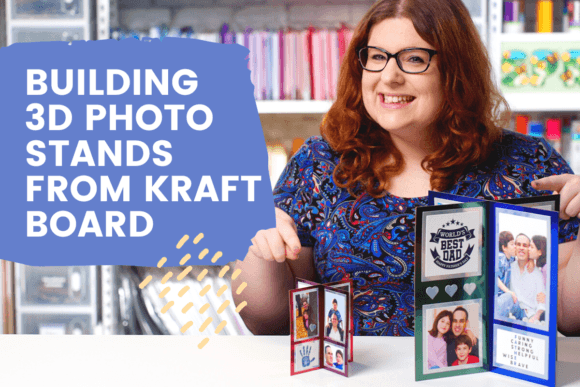
Building 3D Photo Stands from Kraft Board
In a digital world where images are consumed in milliseconds, physical photography holds a unique power to command attention and evoke emotion. Building 3D Photo Stands from Kraft Board is not merely a craft project; it is a strategic way to bridge the gap between flat digital files and tangible, interactive experiences. By leveraging the structural integrity of kraft board and the precision of modern cutting tools like the Cricut machine, creators can produce showstopping three-dimensional photograph displays that serve as powerful marketing assets, memorable gifts, or dynamic interior decor.
This approach transforms static memories or brand imagery into sculptural objects. Unlike traditional photo albums or flat prints that sit passively on a shelf, a 3D photo stand invites interaction. It adds depth, dimension, and a tactile quality that resonates with viewers. Whether you are a small business owner looking to enhance your unboxing experience, an educator creating classroom materials, or a hobbyist wanting to display family heirlooms, this method offers a versatile solution for bringing two-dimensional images into a three-dimensional space.
The Power of Material and Precision
Kraft board is chosen for its distinct aesthetic and functional properties. It provides a sturdy, eco-friendly base that contrasts beautifully with vibrant photographs. The natural brown tone of the board often complements a wide range of color palettes, allowing the image itself to take center stage without visual competition. However, the true magic lies in the execution. Achieving clean lines and perfect alignment requires more than just scissors and glue.
This is where the integration of a Cricut machine becomes essential. The print-then-cut feature allows users to print high-resolution images onto standard paper or cardstock using a home printer, and then use the machine’s optical sensors to trace the printed edges and cut them out with millimeter precision. This technology eliminates the guesswork of manual cutting, ensuring that every photo fits seamlessly into its designated slot or frame within the 3D structure. For professionals who value consistency and speed, this workflow is indispensable.
Creative Applications and Use Cases
The versatility of 3D photo stands opens up numerous applications across different sectors. Understanding these use cases helps in tailoring the design to specific goals, whether they are commercial, educational, or personal.
Brand Storytelling and Marketing
For entrepreneurs and marketers, branded merchandise is a key touchpoint in customer engagement. A custom 3D photo stand featuring a product launch, a team photo, or a customer testimonial can be included in subscription boxes or shipped as a thank-you gift. It extends the life of the brand interaction long after the initial purchase. Imagine a coffee brand including a miniature 3D display of their roasting process or a travel agency providing a stand showcasing exotic destinations. These items become conversation starters and reinforce brand identity through tactile experience.
Educational Tools and Classroom Decor
Educators can utilize this technique to create interactive learning aids. History teachers might build stands depicting significant historical figures or events, while science classes could use them to illustrate biological structures or geological formations. The 3D aspect helps students visualize concepts that are difficult to grasp from flat diagrams. Furthermore, these stands can be used as part of a classroom library or bulletin board, adding a layer of visual interest that encourages exploration and reading.
Personal Milestones and Gifting
On a personal level, 3D photo stands are ideal for commemorating life events. Wedding invitations, anniversary gifts, or baby shower favors can be elevated with a custom-made stand displaying a couple’s journey or a child’s first year. The handmade quality adds a sentimental value that store-bought items lack. Because kraft board is durable yet lightweight, these gifts are easy to ship and present, making them practical for long-distance relationships.
Designing for Impact: Best Practices
To ensure that your 3D photo stands are both visually appealing and structurally sound, consider the following design principles. These guidelines help maintain clarity and effectiveness, ensuring the final product meets professional standards.
- Scale and Proportion: Always test your designs at actual size before committing to large runs. The relationship between the photo dimensions and the base structure is critical. A photo that is too small may get lost, while one that is too large may overwhelm the design. Use the templates provided in the class materials as a starting point, but feel free to adjust proportions based on your specific image content.
- Color Contrast: Since kraft board has a warm, earthy tone, choose images with colors that pop against this background. Cool tones like blues and greens often create a striking contrast, while warm tones can create a harmonious, vintage feel. Avoid placing low-contrast images directly on the board without a border or backing.
- Structural Integrity: Ensure that the interlocking parts of your design are robust enough to support the weight of the photos. Reinforce stress points if necessary. The print-then-cut feature allows for precise scoring lines, which can be used to create crisp folds that hold the structure together securely.
- Consistency in Series: If you are creating multiple stands for a collection, such as a set of historical figures or a series of product shots, maintain consistent styling. Use the same font for labels, the same border width, and similar structural elements. This creates a cohesive look that feels professional and intentional.
Adapting to Different Audiences and Platforms
Different audiences have different needs, and your 3D photo stands should reflect that. For a corporate audience, opt for sleek, minimalist designs with sharp angles and monochromatic accents. The focus should be on professionalism and clarity. For a younger, creative audience, you might experiment with playful shapes, bold colors, and irregular forms. The goal is to align the physical form of the stand with the emotional response you want to elicit.
Social media also plays a role in how these projects are perceived. When sharing your creations online, highlight the process. Show the transition from digital file to printed sheet to finished 3D object. Videos demonstrating the assembly process can be particularly engaging, as they provide value to viewers who may want to replicate the project. This transparency builds trust and establishes you as a knowledgeable creator in your niche.
Organizing Your Workflow
Efficiency is key when producing multiple units. Organize your workspace by separating the printing, cutting, folding, and assembly stages. Keep your templates well-organized in digital folders, labeled clearly by project name and date. This system prevents errors and saves time. Additionally, invest in quality adhesive. While white glue works, strong double-sided tape or a hot glue gun can provide faster bonding and a cleaner finish, especially when working with thicker layers of board.
By combining the artistic potential of kraft board with the technological precision of a Cricut, you unlock a new dimension in photo presentation. This method is accessible to beginners yet sophisticated enough for professional designers. It encourages creativity while providing a structured framework for success. Whether you are enhancing your brand’s presence, enriching an educational environment, or preserving personal memories, building 3D photo stands is a rewarding endeavor that yields tangible results. Start with the available templates, experiment with your own images, and discover how three-dimensional displays can transform the way people interact with your visual content.