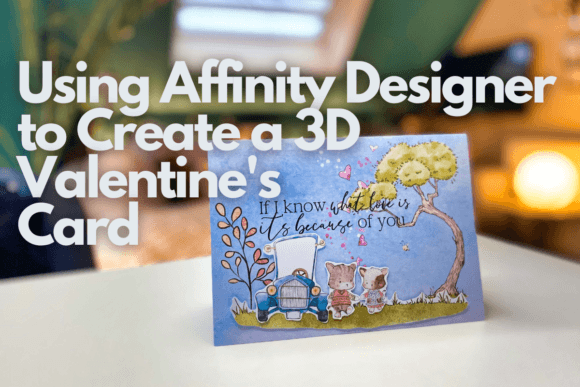
Using Affinity Designer to Create a 3D Valentine’s Card
In an era where digital communication often overshadows physical interaction, the value of a tangible, handcrafted item has not diminished; rather, it has intensified. For those seeking to express genuine affection on February 14th, the traditional store-bought card often feels insufficiently personal. This is where Using Affinity Designer to Create a 3D Valentine’s Card emerges as a compelling solution. It bridges the gap between professional-grade design capabilities and the intimate, heartfelt gesture of a homemade gift. By leveraging vector-based software like Affinity Designer, creators can produce intricate, printable designs that are then transformed into three-dimensional objects, resulting in a keepsake that stands out in both aesthetic quality and emotional resonance.
The process described in this context involves a two-stage workflow: first, designing a flat, high-resolution graphic using Affinity Designer, and second, utilizing that asset to construct a physical or simulated 3D card structure. This approach offers significant advantages over standard raster-based editing tools, particularly when dealing with scalable graphics and precise cut lines required for paper crafting. The result is a one-of-a-kind Valentine’s day card for your loved ones that reflects careful thought, technical skill, and artistic effort.
The Strategic Advantage of Vector Design in Paper Crafting
At the core of this project lies the decision to use Affinity Designer, a professional vector graphics editor. Unlike pixel-based editors, vector software allows designers to create images defined by mathematical equations rather than fixed grids of pixels. This distinction is critical when preparing assets for print and physical assembly. When you are Using Affinity Designer to Create a 3D Valentine’s Card, the ability to scale elements without loss of quality ensures that intricate details—such as delicate lace patterns, fine text, or complex geometric shapes—remain crisp and legible regardless of the final output size.
Furthermore, vector files facilitate precise control over line weights and colors, which is essential for creating clean cut lines and fold markers. In the context of creating a 3D pop-up or layered card, these technical specifications determine whether the final product folds correctly and stands up structurally. Affinity Designer provides robust tools for managing layers, grouping objects, and exporting files in formats compatible with cutting machines (such as SVG or PDF) or high-quality printers. This level of precision reduces material waste and increases the likelihood of a successful first attempt, a practical benefit for both hobbyists and small business owners looking to offer premium handmade goods.
From Digital Canvas to Physical Form
The transition from a digital file to a physical object is where the creative magic happens. Monja’s class methodology emphasizes teaching users how to take their printed designs and assemble them into a beautiful Valentine’s Card in 3D. This step requires an understanding of spatial relationships and structural integrity. A 3D card is not merely a flat image folded in half; it is an engineered object that uses tabs, slots, and folds to create depth and movement.
When executing this part of the workflow, several key characteristics come into play:
- Structural Planning: Before printing, the designer must account for the thickness of the cardstock and the mechanics of the pop-up mechanism. Affinity Designer allows for the creation of guides and templates that visualize these constraints before any ink is applied.
- Material Selection: The choice of paper stock significantly impacts the final look and feel. Thicker cardstocks provide better stability for complex 3D structures but may require scoring to prevent cracking along fold lines. Lighter papers allow for finer detail but may lack rigidity.
- Assembly Precision: The accuracy of cuts and folds determines the symmetry and balance of the card. Using tools like craft knives, bone folders, and alignment jigs ensures that the assembled card meets professional standards.
This hands-on aspect adds a layer of authenticity that digital-only gifts cannot replicate. The recipient holds something that was physically constructed, feeling the texture of the paper and witnessing the mechanical surprise of the 3D element unfolding. It is a tactile experience that reinforces the message of care and attention.
Evaluating Usability and Learning Curve
For professionals, educators, and serious hobbyists, the question of usability is paramount. Affinity Designer is known for its powerful feature set, but this power comes with a learning curve. Users familiar with industry-standard tools like Adobe Illustrator will find the interface intuitive, though there are differences in tool naming and keyboard shortcuts. For beginners, the software offers a more affordable entry point into professional design, eliminating subscription fees while delivering comparable functionality.
In the specific context of Using Affinity Designer to Create a 3D Valentine’s Card, the learning curve is manageable if approached systematically. The initial phase involves mastering basic shape manipulation, text styling, and layer management within the software. The second phase involves understanding paper engineering principles. While the software does not automatically generate 3D structures from 2D drawings, it provides the necessary tools to draft the blueprints for such structures. This hybrid skill set—combining digital design with manual craftsmanship—is highly valuable. It empowers individuals to customize every aspect of their card, from typography and color palette to the complexity of the pop-up mechanism.
Potential limitations include the time investment required to learn both the software and the crafting techniques. However, the long-term value justifies this investment. Once proficient, users can repurpose their skills for other projects, such as wedding invitations, business branding materials, or educational resources. The versatility of vector design extends far beyond Valentine’s Day, making it a worthwhile skill acquisition for freelancers and content creators.
Who Benefits Most from This Approach?
The audience for this type of project is diverse. Small business owners who sell handmade goods on platforms like Etsy can enhance their product offerings by providing customizable, high-end 3D cards. Entrepreneurs and marketers might use similar techniques to create unique promotional items that stand out in a crowded market. Educators and parents can engage children in STEM-related activities by combining design logic with physical construction, fostering creativity and problem-solving skills.
For individuals, the primary benefit is emotional. Creating a personalized gift demonstrates effort and intimacy. In a world saturated with mass-produced items, a card designed and built by hand carries significant sentimental weight. It signals that the giver took time to understand the recipient’s tastes and invested energy in producing something unique. This aligns perfectly with the goal of showing your loved ones how much you care with a homemade Valentine’s day card, straight from the heart.
Practical Recommendations for Success
To maximize the effectiveness of Using Affinity Designer to Create a 3D Valentine’s Card, consider the following practical recommendations:
- Start Simple: Begin with a basic pop-up structure, such as a V-fold or a simple lift, before attempting complex multi-layered mechanisms. Mastery of basics ensures reliability in more advanced projects.
- Test Prints: Always print a prototype on scrap paper to check dimensions, fold lines, and visual balance before using expensive cardstock. This step saves materials and prevents frustration.
- Optimize File Settings: Ensure that your Affinity Designer files are set to the correct color mode (CMYK for print) and resolution (300 DPI or higher). Include bleed areas to avoid white edges after cutting.
- Experiment with Textures: Use Affinity’s texture brushes and gradient maps to add depth to your digital designs, mimicking the look of real-world materials like foil, embossing, or watercolor.
By adhering to these practices, creators can produce cards that are not only visually stunning but also structurally sound. The combination of digital precision and analog craftsmanship results in a product that is greater than the sum of its parts. It transforms a simple greeting into a memorable artifact, preserving the memory of the occasion long after the holiday has passed.
Conclusion
The initiative to create a custom 3D Valentine’s card using Affinity Designer represents a thoughtful intersection of technology and tradition. It challenges the norm of disposable greetings by encouraging the production of durable, artistic, and deeply personal items. Whether for a romantic partner, a family member, or a valued client, the effort invested in Using Affinity Designer to Create a 3D Valentine’s Card yields a return in the form of strengthened relationships and tangible appreciation. For those willing to invest the time in learning the tools and techniques, the reward is a creative outlet that produces meaningful work, demonstrating that in the age of instant communication, the slow, deliberate act of making something by hand remains profoundly relevant and impactful.