Bringing Depth to Nursery Decor: The Art of the Baby Giraffe Nursery Room 3D Shadow Box
The modern nursery is no longer just a place for sleeping; it has evolved into a curated space that reflects personality, warmth, and artistic intent. Among the various DIY decor trends gaining traction, layered paper art stands out for its ability to transform flat surfaces into immersive, three-dimensional experiences. At the forefront of this trend is the Baby Giraffe Nursery Room 3D Shadow Box, a sophisticated craft project that combines precision cutting with creative assembly to create a stunning focal point for any child’s room.
This article explores the intricacies of creating, assembling, and displaying these intricate paper structures. Whether you are a seasoned crafter looking for your next challenge or a parent seeking a unique, handmade gift, understanding the mechanics and aesthetic potential of 3D shadow boxes will provide valuable insight into this growing hobby.
Understanding the Mechanics of Layered Paper Art
A 3D shadow box is fundamentally different from traditional framing. While a standard frame holds a single image or document against a flat background, a shadow box utilizes depth. It achieves this through multiple layers of material—typically cardstock—stacked at varying distances from the backboard. Each layer reveals a portion of the design, creating an illusion of depth and perspective when viewed from the front.
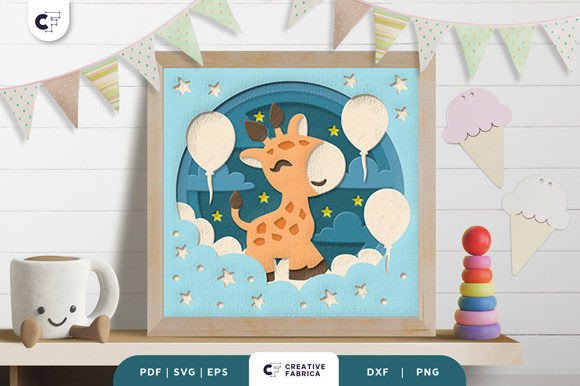
The Baby Giraffe Nursery Room 3D Shadow Box exemplifies this technique. With nine distinct layers, the design guides the eye from the foreground elements, such as the baby giraffe, through mid-ground details like trees or clouds, to the background scenery. This layering process requires patience and precision, but the result is a piece of wall art that changes subtly depending on the viewing angle and lighting conditions.
The Importance of Material Quality
The success of any shadow box project relies heavily on the substrate used. Thin paper may buckle or tear during assembly, while overly thick material can be difficult to cut with precision. For professional results, high-quality cardstock is essential. The recommended specification for this particular design is Encore Cardstock 80 lb cover (216 gsm). This weight provides the necessary rigidity to hold its shape without being so dense that it strains cutting machine blades or becomes cumbersome to glue.
Using premium cardstock ensures that the edges remain crisp and clean, which is vital for maintaining the sharp contrast between layers. Additionally, the color consistency of high-grade cardstock prevents unwanted variations that could distract from the visual harmony of the final piece.
Digital Formats and Cutting Technologies
In the digital age, crafting has become increasingly accessible thanks to computer-cutting machines. The Baby Giraffe Nursery Room 3D Shadow Box template is provided in a versatile suite of file formats to accommodate different workflows and skill levels.
- SVG (Scalable Vector Graphics): This is the primary format for use with electronic cutting machines such as Cricut, Silhouette, and Brother ScanNCut. SVG files are vector-based, meaning they can be resized without losing quality. However, it is crucial to maintain the original aspect ratio to ensure the layers align correctly. If you resize the design, you must scale all layers proportionally.
- PDF (Portable Document Format): Ideal for users who prefer to print the design onto cardstock and cut it manually. PDFs preserve the layout and dimensions, making them suitable for home printing or commercial printing services.
- EPS (Encapsulated PostScript): A widely supported vector format compatible with professional graphic design software like Adobe Illustrator and InDesign. This allows for advanced customization before cutting.
- PNG (Portable Network Graphics): A raster image format useful for previewing the design or for those who wish to trace the outlines manually if digital tools are unavailable.
- DXF (Drawing Exchange Format): Another vector format often used in CAD applications and some cutting software, ensuring broad compatibility across different platforms.
The Assembly Workflow: From Flat Sheets to 3D Art
Creating a 3D shadow box is a methodical process that rewards attention to detail. The workflow generally follows these steps:
- Cutting: Load your chosen file into your cutting machine or print the PDF. If using a machine, ensure your blade is sharp and your mat is sticky enough to hold the cardstock firmly. For manual cutting, a precision art knife and a self-healing cutting mat are indispensable tools.
- Weeding: Remove the excess material from around the cut designs. This step can be tedious, especially with intricate details, but using tweezers can make the process smoother and more precise.
- Preparation: Sort the layers by number. Typically, Layer 1 is the background, and subsequent layers move toward the foreground. Check each layer against the reference image to ensure no pieces were missed.
- Assembly: This is where the magic happens. You will need strong adhesive, such as double-sided tape or liquid glue. Small foam spacers or strips of cardstock are often used between layers to create the physical gap that defines the "shadow" effect. Start from the back layer and work forward, ensuring each layer is centered and aligned.
- Final Touches: Once assembled, place the structure into a deep-frame shadow box frame. Secure the backing and hang the piece on the wall.
Creative Applications and Customization
While the Baby Giraffe Nursery Room 3D Shadow Box is designed as a decorative item for a nursery, its versatility extends beyond simple wall hanging. Crafters often experiment with lighting and display methods to enhance the visual impact.
Illuminating the Layers
One of the most popular modifications for shadow boxes is the addition of LED strip lights. By placing flexible LED strips behind the layers, specifically near the backboard or between specific strata, you can create a glowing effect that highlights the silhouettes. This transforms the artwork into a soothing nightlight, perfect for a baby’s room. The light diffuses through the layers, softening the shadows and adding a magical ambiance. When implementing this, ensure that the heat generated by the LEDs does not warp the cardstock or damage the adhesive.
Gifting and Personalization
Handmade 3D shadow boxes make exceptional gifts for new parents, baby showers, or birthdays. The personal touch involved in selecting colors, choosing the frame, and assembling the layers adds emotional value that store-bought items cannot replicate. Because the SVG files can be resized, you can adapt the design to fit various frame sizes, allowing for flexibility in presentation. Some creators even add small embellishments, such as glitter glue or dimensional paint, to specific layers to add texture and shine.
Considerations for Success
To achieve the best results, consider the following practical tips:
- Lighting Sources: The final appearance of the shadow box can vary based on ambient lighting. Natural light will show true colors, while artificial light may cast warm or cool tones. Test your finished piece in the intended location before sealing it permanently.
- Color Accuracy: As noted in product descriptions, images are for preview purposes only. The actual color may vary slightly due to monitor settings and the specific batch of cardstock used. Always order a sample pack if you are concerned about color matching.
- Precision Alignment: Misaligned layers can ruin the 3D effect. Use a centering tool or measure carefully from the edges of each layer to ensure symmetry. Taking your time during the gluing phase is critical.
- Tool Maintenance: Regularly check your cutting blades. Dull blades can tear delicate paper and require excessive force, leading to inaccuracies.
The Broader Appeal of Digital Crafting
The rise of digital templates like the Baby Giraffe Nursery Room 3D Shadow Box represents a shift in how we consume and create art. It democratizes complex design, allowing individuals without formal training in graphic design or carpentry to produce gallery-worthy pieces. This accessibility fosters a community of creators who share techniques, color palettes, and modifications online.
For educators, these projects serve as excellent STEM/STEAM activities, teaching geometry, spatial reasoning, and fine motor skills. For business owners, offering custom shadow box services can be a lucrative niche in the personalized gift market. The combination of digital precision and tactile assembly bridges the gap between technology and traditional crafts, appealing to a broad demographic.
Conclusion
The Baby Giraffe Nursery Room 3D Shadow Box is more than just a decoration; it is a testament to the beauty of layered craftsmanship. By leveraging digital tools and high-quality materials, anyone can create a unique, depth-rich piece of art that enhances a nursery’s atmosphere. Whether used as a static wall hanging or illuminated with LEDs, this project offers endless possibilities for creativity. As the demand for personalized, handmade decor continues to grow, mastering the art of the 3D shadow box provides both a rewarding hobby and a valuable skill set for the modern crafter.