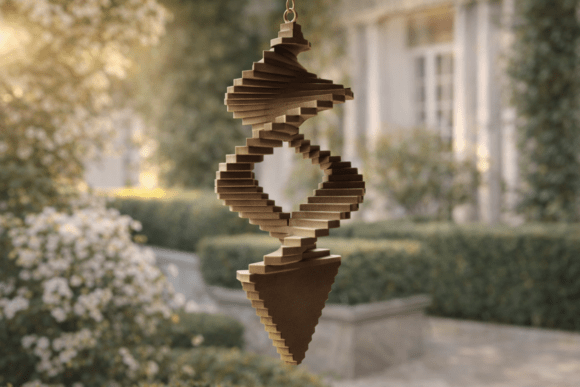
3D Wind Spinner STL 3MF: Bringing Movement and Calm to Your Outdoor Spaces
In an era where personalizing our living spaces has become a priority, the intersection of technology and traditional decor offers some of the most rewarding projects for hobbyists. Among these, the 3D Wind Spinner STL 3MF stands out as a perfect blend of artistic expression and functional design. Specifically, designs like the ✨ Windcatcher V2 ✨ allow enthusiasts to transform simple plastic filament into dynamic art pieces that respond to their environment. This guide explores how you can leverage these digital files to create calming, visually stunning wind spinners for your garden, balcony, or interior rooms.
Understanding the Digital Foundation: What is a 3D Wind Spinner STL 3MF?
To successfully print any object, one must first understand the source material. A 3D Wind Spinner STL 3MF refers to the digital file formats used in additive manufacturing. While STL (Stereolithography) is the traditional standard for sharing 3D models, 3MF (3D Manufacturing Format) is a more modern, XML-based file format developed by Microsoft. The 3MF format is superior because it can store color information, texture data, and multiple parts within a single file, ensuring that what you see on your screen matches exactly what comes off the printer.
When downloading a model like the Windcatcher V2, you are acquiring a precise geometric blueprint. Unlike static statues, wind spinners require specific engineering considerations. The geometry must be balanced to catch the breeze effectively while maintaining structural integrity during rotation. The "STL 3MF" designation ensures that regardless of whether your slicing software prefers one format over the other, the dimensional accuracy remains intact, allowing for a seamless transition from digital concept to physical reality.
Identifying the Need: Why Choose a 3D Printed Wind Spinner?
Many individuals seek ways to bring tranquility and visual interest to their environments without relying on mass-produced items. Traditional metal or wooden wind spinners can be expensive, heavy, or lack the intricate detail possible with modern manufacturing. Furthermore, they often arrive pre-colored, limiting customization options.
The primary challenge for many DIY enthusiasts is finding projects that are accessible yet yield professional results. You might want a decorative piece that:
- Adds gentle motion and sound to a stagnant space.
- Can be customized to match existing exterior or interior color schemes.
- Is lightweight enough to hang from delicate branches or thin wires.
- Offers a satisfying printing experience without excessive waste or time consumption.
The 3D Wind Spinner STL 3MF addresses these needs directly. By utilizing FDM (Fused Deposition Modeling) or resin printing technologies, users can create lightweight, durable, and highly customizable decorations that serve as both art and ambient tools.
Practical Applications and Outcomes
Once printed, the application of these wind catchers is versatile. For outdoor enthusiasts, the Windcatcher V2 serves as an excellent garden ornament. Its ability to rotate in even the slightest breeze creates a mesmerizing effect that draws the eye and encourages mindfulness. It acts as a natural kinetic sculpture, changing its appearance with every gust of wind.
For those with limited outdoor space, such as apartment dwellers, these spinners are ideal for balconies or windowsills. Because they are typically made from PLA or PETG filament, they are weather-resistant enough for covered areas but light enough not to overwhelm small spaces. Inside the home, they can be hung near open windows or in corners with air circulation, adding a subtle, calming movement that complements meditation or reading nooks.
Implementation: How to Print Your Windcatcher V2
Success with any 3D Wind Spinner STL 3MF project relies heavily on preparation and correct printer settings. The Windcatcher V2 is designed with user-friendliness in mind, but attention to detail ensures the best outcome. Here is a step-by-step approach to bringing this design to life.
Preparation and Orientation
The manufacturer recommends laying the model flat as advised in the design notes. This orientation is crucial for minimizing support structures and ensuring smooth surface finishes on the visible parts of the spinner. When importing the file into your slicer, verify that the model is properly scaled and oriented. If the design includes multiple interlocking parts, ensure they are positioned correctly relative to each other to avoid collision during printing.
Recommended Printing Settings
To achieve the balance between strength and weight, which is critical for wind-catching performance, adhere to the following settings:
- Layer Height: Set to 0.2mm. This provides a good balance between print speed and surface detail, ensuring the fins or blades are defined enough to catch air effectively.
- Support Structure: Use Tree Auto supports. Tree supports branch out only where needed, reducing material usage and making post-processing easier. They also minimize contact points, leaving less scar tissue on the final print.
- Infill: 15% infill is sufficient. Since the spinner needs to be lightweight to rotate easily, high infill is unnecessary and may actually hinder its movement by adding unwanted weight. A grid or gyroid pattern works well for structural integrity.
Material and Color Choices
One of the greatest advantages of 3D printing is the ability to pick your favorite color. Whether you choose a translucent filament to let sunlight pass through or a vibrant hue to pop against green foliage, the choice is yours. Some users opt for dual-color prints if their printer supports it, creating complex patterns that enhance the visual spinning effect. Remember to dry your filament before printing, especially if using PLA or PETG, to prevent bubbling that could affect the balance of the spinner.
Assembly and Hanging
After the print is complete, carefully remove any remaining support structures. Sanding rough edges lightly can improve the aesthetic and ensure smooth rotation. The assembly process for the Windcatcher V2 is straightforward. Simply hang the finished piece using fishing line or nylon thread. These materials are nearly invisible, allowing the focus to remain entirely on the spinner itself rather than the suspension method.
Ensure the hanging point is centered to maintain balance. An unbalanced spinner may wobble excessively or fail to rotate smoothly. Test the movement indoors before placing it outdoors to make any necessary adjustments to the hanging length or attachment points.
Considerations for Different Users
Different users may approach this project with varying levels of experience. Beginners should start with PLA filament due to its ease of use and low warping tendencies. Intermediate users might experiment with TPU (flexible filament) for parts that need to bend slightly under wind pressure, though this requires tuning extrusion rates carefully. Advanced users might explore multi-material setups or painting techniques to add weatherproofing and UV resistance for long-term outdoor exposure.
Regardless of skill level, the core benefit remains the same: the creation of a personalized object that interacts with nature. The 3D Wind Spinner STL 3MF is not just a file; it is an invitation to engage with your environment in a tactile, creative way. By following the recommended settings and taking pride in the customization process, you transform a digital download into a tangible source of joy and calm.
Conclusion
Integrating a 3D printed wind catcher into your space is a simple yet impactful project. With the right digital assets, such as the Windcatcher V2, and proper printing techniques, you can create durable, beautiful, and functional decor. Download the files, select your colors, and let the wind do the magic. Whether placed in a bustling city balcony or a quiet suburban garden, your custom wind spinner will serve as a constant reminder of the beauty found in movement and craftsmanship.