3D Kids Night Light Laser Cut Bundle: A Practical Guide for Creators
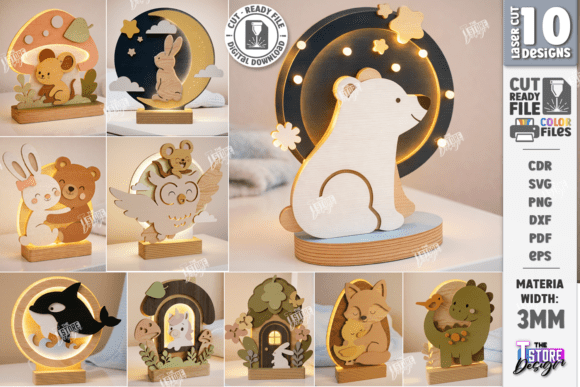
Transforming a simple digital file into a glowing, layered masterpiece is one of the most satisfying experiences in laser cutting. For parents, educators, and hobbyists looking to add a touch of warmth to a nursery or bedroom, the 3D Kids Night Light Laser Cut Bundle offers an excellent starting point. This collection features cute cartoon animal designs designed specifically for 3mm plywood, allowing you to create stunning light boxes that double as decorative nursery decor. However, simply buying the files is only half the equation. To ensure your final product looks professional rather than amateurish, there are critical technical details regarding file formats, software compatibility, and material selection that often go overlooked.
Understanding the Digital Product Ecosystem
When you purchase this bundle, you are not just getting a single image; you are acquiring a comprehensive toolkit for fabrication. The zip archive includes ten distinct SVG, EPS, PNG, PDF, and DXF files for each design. This variety is intentional, catering to different machines and software preferences. For instance, if you use Glowforge, the SVG format is typically seamless. If you operate a CO2 laser with Ruida controllers using RDWorks, the DXF or AI formats might be more stable. Having multiple options allows you to troubleshoot if one format behaves unexpectedly on your specific setup.
The inclusion of transparent PNGs is particularly useful for previewing how the layers will stack before you commit to cutting expensive wood. It allows you to visualize the depth and spacing of the cartoon animals—such as bears, rabbits, or cats—ensuring the aesthetic matches your vision. Meanwhile, the PDF files serve as excellent reference guides for alignment and layer order, which is crucial when assembling the final 3D structure.
Common Pitfalls in Software and File Handling
One of the most frequent sources of frustration for laser cutters involves software distortion, particularly within LightBurn. While LightBurn is a powerful and popular tool, it can sometimes misinterpret dimensions when importing SVG files. This distortion can lead to parts that are slightly too small or large, ruining the precise fit required for a multi-layered night light. If your pieces do not snap together snugly, the structural integrity of the lamp suffers, and gaps may appear where light leaks out unevenly.
To avoid this, experts recommend prioritizing the DXF file format when working in LightBurn. DXF files tend to retain their dimensional accuracy better across different vector platforms. If you must use SVGs, always verify the scale immediately after import by measuring a known dimension against your machine’s bed size. Another common mistake is ignoring the transparency of the PNG previews. Users sometimes assume the white background in a standard JPG preview represents the wood, leading to confusion about which parts are solid cuts versus open spaces. Always rely on the transparent PNG or the layered PDF guide to understand the true geometry of the design.
Material Selection and Cutting Settings
The design specifications explicitly call for 3mm plywood. This thickness is not arbitrary; it is calculated to provide enough bulk for the interlocking tabs while remaining thin enough to allow light to diffuse softly through the edges. Using a thicker board, such as 4mm or 6mm, will prevent the layers from sliding together correctly, forcing you to glue them externally, which compromises the clean, floating look of the 3D effect. Conversely, thinner materials like 2mm basswood might warp under the heat of the laser or lack the durability needed for a child’s room.
Furthermore, the type of plywood matters significantly. Standard construction plywood often contains voids, glue lines, and inconsistent densities that can cause burning inconsistencies or even fire hazards during cutting. For night lights, where safety and aesthetics are paramount, it is advisable to use high-quality birch plywood or basswood. These materials have fine grain structures that accept laser settings cleanly, resulting in smooth edges that require minimal sanding. Rough, charred edges not only look unprofessional but can also snag on clothing or hands, posing a minor safety risk in a child’s environment.
Assembly and Finishing Techniques
Once the cutting is complete, the assembly process requires patience. A common error is rushing the stacking phase. Each layer of the 3D design relies on friction-fit tabs. If the laser power was set too high, the tabs may have been burned away, leaving holes instead of protrusions. If the speed was too fast, the kerf (the width of the cut) might be too narrow, making insertion difficult. In these cases, lightly sanding the edges or adjusting your machine’s focus can help. Test cuts on scrap material are essential to dial in the perfect balance between holding power and ease of assembly.
Another overlooked detail is the internal lighting source. Many creators mistakenly use bright, harsh LED strips that blow out the details of the cartoon faces. Instead, opt for warm-white LED fairy lights or a low-lumen bulb housed in a socket that fits inside the base. The goal is soft diffusion. You can further enhance this by placing a piece of tracing paper or frosted acrylic behind the back layer of the design. This scatters the light evenly, eliminating hot spots and creating a gentle, soothing glow ideal for bedtime routines.
Evaluating Compatibility and Support
Before diving into production, always check your machine’s compatibility with the provided file types. While the bundle includes formats for almost every major software, some older plotters or engravers may struggle with complex SVG paths. Additionally, be aware that LightBurn users should strictly adhere to the DXF recommendation to prevent dimension errors. If you encounter issues, reaching out to the creator is a prudent step. They are often willing to assist with alternative file types or larger PNG sizes if your specific printing or preview needs differ from the standard offerings.
For entrepreneurs and sellers, this bundle offers a viable path to creating handmade goods. However, success depends on execution. Poor cutting settings or incorrect material choices will result in products that do not meet customer expectations. By focusing on precision, proper material selection, and careful assembly, you can turn these digital vectors into high-quality, marketable nursery decor. Remember to follow the shop for future releases, as expanding your library of compatible designs allows for greater creativity and variety in your offerings.
Final Checklist for Success
- Verify Dimensions: Always measure imported files, especially SVGs in LightBurn, to prevent scaling errors.
- Choose the Right Format: Use DXF files for maximum stability in LightBurn; use SVG for Glowforge.
- Select Quality Wood: Stick to 3mm birch or basswood plywood to avoid warping and ensure clean cuts.
- Test Your Lights: Use warm, diffused lighting to highlight the 3D layers without causing glare.
- Check Assembly Fit: Ensure tabs are intact and slots are clear for a snug, glue-free fit.
By paying attention to these practical details, you move beyond simply following instructions to truly understanding the craft. The 3D Kids Night Light Laser Cut Bundle provides the artistic foundation, but your technical diligence ensures the final result is a beautiful, safe, and durable addition to any child’s room.